Wednesday, January 21, 2015

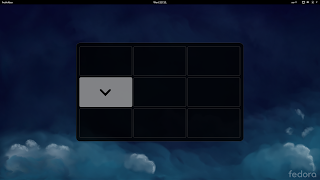
Workspace Grid In Fedora 21

If you are running Fedora 21, you know that the built in workspace functionality sucks.

Thankfully, there's a simple workaround to get back your old fashioned grid workspaces!


Instructions:

1. Download Gnome Tweak Tool
2. Download the workspace extension code
3. Copy the workspace-grid@mathematical.coffee.gmail.com/ directory to ~/.local/share/gnome-shell/extensions/
4. Open Gnome Tweak Tool and enable the plugin

Hope that helps! Please let me know in the comment section if you have problems.


Sunday, March 16, 2014

Web Project Seed

I've created a template web project for easily getting started with new web applications. The image underneath shows a rough architecture of how it works.


The technogies included are listed below:
  1. Groovy
  2. Java (8)
  3. Spring (4)
  4. MongoDB
  5. Gradle
  6. Maven
  7. Node.js
  8. gulp.js

The code

Grab the code from GitHub here.

You may use this project as a starting point in any of your new web applications.
Happy coding!

Saturday, July 27, 2013

npm update error in Linux


Error

If you get the following error while updating npm:

error: unpacking of archive failed on file /usr/lib/node_modules/npm/doc: cpio: rename
or
Error: Cannot find module '../lib/npm.js'

Solution

Simply try to remove npm with your package manager, if that's how you installed it, or manually remove it. Then remove the following:

/usrlib/node_modules/npm
and
/usr/bin/npm

That should fix the broken packages, and you can try to reinstall npm!

Hope that helps!

Thursday, April 11, 2013

AngularJS controller

So I spent quite a lot of time figuring out how to set up an AngularJS controller without polluting the default namespace/scope. Here is the recipe with a simple click listener showing that it works:

index.html

<doctype html>
<html ng-app="main">
  <head></head>
  <body ng-controller="mainController">
    <button ng-click="log()">Log</button>
    <script type="text/javascript" src="angular.min.js"></script>
    <script type="text/javascript" src="main.js"></script>
  </body>
</html>

main.js

var main = angular.module('main', []);

main.controller('mainController', function($scope) {
  $scope.log = function() {
    console.log('Logging a simple message...');
  }
});

You can easily see which names map to which implementation, e.g. ng-app="main" is angular.module('main', []);, so on and so fourth.

Note: It is extremely important to invoke angular.module with the second argument (in this case, the empty array), otherwise, it is not going to work.

Wednesday, April 3, 2013

Git push to Amazon EC2

If you have an Amazon EC2 instance, it is fairly straightforward to use Git to push your changes to it. The steps to do so are listed below.

On the server

1. Create the directory which will be the project root directory
mkdir myproject

2. Step into the directory and initialize a bare repository
cd myproject
git init --bare

3. Create post-receive and make it executable. This will ensure everything that is pushed is automatically incorporated into the project folder you created.
touch hooks/post-receive
chmod +x hooks/post-receive

4. Edit hooks/post-receive to include the Git work tree where everything that is pushed is eventually put.
vim hooks/post-receive # ...And add the below statement to it
GIT_WORK_TREE=/home/ec2-user/myproject git checkout -f

If you've carefully followed every step, this is all you need to do on the server.

On the client

1. Inside your Git project, add the address of the server
git remote add ec2 ec2-user@your-amazon-address:myproject

2. Finally, you should be able to push to your Amazon EC2 server
git push ec2 master

If you've carefully followed every step, this is all you need to do on the client.

Now you can check that everything you pushed is there in your project folder on the server.

Thanks for reading! Let me know in the comments below if you are having problems with any part of this tutorial.

Sunday, February 17, 2013

Simple RMI Tutorial

I have tried to make this RMI tutorial as short as possible, so that you may get started creating your own RMI applications as soon as possible.

The Callee


1. Fist of all you will have to create a project, e.g. rmi-callee.

2. Inside foo you will need to define a remote interface which the invoker may use.

For this example, we have a method greet in the interface Greetable which will reside in the default package (directly within src/):

import java.rmi.Remote;
import java.rmi.RemoteException;

public interface Greetable implements Remote {
    String greet() throws RemoteException;
}

3. The next step is to actually implement the interface in our class, again in the default package:

import java.rmi.Naming;
import java.rmi.RemoteException;
import java.rmi.server.UnicastRemoteObject;

class Greeter extends UnicastRemoteObject implements Greetable {

    public Greeter() throws RemoteException { super(); }

    @Override
    public String greet() throws RemoteException { return "Hi"; }

    public static void main(String[] args) throws Exception {

        // Bind an instance to rmiregistry
        Naming.bind("rmi://localhost/Greeter", new Greeter());
    }
}


Now that you have your class exposing some functionality, you may want to check if it works. From the command line create a script that will run your class named run.sh. Note: if you are using Windows, you might want to download MinGW to make your life a bit simpler.

4. First, create the JAR file containing the interface. PS: You should to be in the root of your project to do this:
cd rmi-callee/
jar cvf g.jar -C bin/ Greetable.class

5. Create the script to run the program:
touch run.sh
chmod +x run.sh

6. Inside run.sh:
java -cp bin/\
     -Djava.rmi.server.codebase=file:your/path/rmi-callee/g.jar\
     Greeter

7. Start rmiregistry as a background process:
rmiregistry &

8. Start the program:
./run.sh

It should now be running. If you get an exception, you are not doing it right. Be sure you have followed every step thoroughly, and are running each command from the right directory.

The Caller


Now you would like to create a caller which invokes the callee.

1. Create another project, e.g. rmi-caller.

2. Manually copy the Greetable interface from the first project into this one.

3. In the default package, create a class Main:
import java.rmi.Naming;

public class Main {

    public static void main(String[] args) throws Exception {
        Greetable g = (Greetable) Naming.lookup("rmi://localhost/Greeter");
        System.out.println(g.greet());
    }
}

4. Create the script to run the program:
cd rmi-caller/
touch run.sh
chmod +x run.sh

5. Inside run.sh:
#!/usr/bin/sh
java -cp bin/ Main

6. Run the example:
./run.sh

It should now invoke the callee if it is running, and output Hi. If you get an exception, you are not doing it right. Be sure you have followed every step thoroughly, and are running each command from the right directory.

Summary and code

I hope this tutorial will help you develop RMI systems. You can find the source code to rmi-callee and rmi-caller below:
Saturday, October 27, 2012

Ruby get method arguments

So, say you are writing some Ruby code, and want to get an overview of the arguments for a method, dynamically.

Consider this method with arguments a and b:

def foobar a, b
end

Using method(...), we can pass in the special variable __method__ to get the current method.

In turn, we can get the parameters of the method with .parameters, and we can then iterate over the parameters.

Now our code would look something like this:

def foobar a, b
  method(__method__).parameters.each do |arg|
    # ...
  end
end

In order to get the correct parameter name with it's associated value, the final solution would be:

def foobar a, b
  method(__method__).parameters.each do |arg|
    val = eval arg[1].to_s
    puts "#{arg[1]}: #{val}, #{val.class}"
  end
end

Happy coding!